Short Sleeves for Larp

The weather forecast predicted degrees hovering just below 30 Celsius with no let up in sight. So on Wednesday evening, I went through the pattern magazines stash and found Simplicity 16 – Model 49-52, a blouse with a drawstring top. Traced the pieces, cut out the fabric (leftovers from the long sleeve top) and sewed the thing together.

I used French seams throughout most of it. The fabric frays so badly that this is needed. However, at some points doing that would have made seams so thick that it would not have been comfortable. The sleeve hems are not sown double and the facing is some black bias tape. All in all, the shirt worked quite well which is why there is now a second iteration.. Come back later to check that out.

Bottle Cover

A weekend at a larp and a new bottle require a new bottle cover. The new bottle was a lot larger than previous bottles and would not work for it’s intended purpose. I did base the design in part on my previous version Invisible Plastic.

After the hat I still had some more of the wool left over and figured it would work as a more or less waterproof cover. I cut out a circle, added some sides and a hanging loop. I needed to attach to pieces together to form a large enough rectangle for the sides. Then I needed to figure out how to close the thing. I the end, I opened up the front a little and keep the flaps to close over each other. Then I added another button to the front and a semi-decorative closure in a vague leaf shape.

I made it somewhat too big by accident and decided to sew an additional seam at the front to make sure it was not too loose. This also allowed me to open up part of the piecing on the front and create a miniature pocket. For proof I added a brownie spoon, it will probably hold a pencil while in action. (note from after the event, yep, it did)

Rain

It currently feels very autumny (i.e. rainy), in the Netherlands. This would usually not be a problem, with me having central heating and a roof over my head. However, I will set off again this Friday for some larping. Rain and larp are, in my opinion, not a good combination for a few reasons. First, I get cold ridiculously fast and generally don’t warm up by myself, and rain is cold. Second, rain makes things wet. Not all my things are waterproof, ergo, my stuff gets wet. Some of the stuff won’t mind, but other stuff does mind. My feet for example, aren’t usually covered by the most waterproof substances out there in the world. So when the setting up crew posted the picture below to Facebook, I had to think of a plan, stat!

Rain

Now, we are all hoping that the rain stops quickly and doesn’t return until, say, Wednesday. The other thing we are hoping for is that the water that is now there will drain away quickly. However, in case thing two doesn’t happen, I need something that will keep the feet dry. To accomplish this, I decided to purchase rubber boots. I do own red rubber boots, but they are at my parents house, so that doesn’t work very well.

This plan did pose another problem.. Rubber boots don’t do very well in a medieval setting, especially when they have a floral design (couldn’t find plain black ones in my size). I need to cover those babies up with something. So in the same shop (where they have EveryThing), I also bought a faux fur pillow case, thinking that I could make some faux fur boots. I basically drew around the boots, added some length to the top, cut it and sewed it. Then I attached elastic at two points in order to keep the cover on the boot. I’ll let you know if they worked out!

On and off Bottom

Most left is the boot, without cover, middle left a boot with cover, middle right the bottom elastic and most right another boot with cover. You can see the ‘improvement’ the cover provides. At least when you consider them needing to be semi appropriate in a medieval setting. The other improvement is that the top doesn’t cut into your leg when there is a layer of faux fur in between. Now off to bed to see if I can get enough sleep to get the remainder of my stuff ready in time for tomorrow.

Invisible Plastic

The gift!

OLYMPUS DIGITAL CAMERA

Can you guess what it is?

OLYMPUS DIGITAL CAMERA

And now? Well, find the answer below!

OLYMPUS DIGITAL CAMERA

It is a… plastic bottle carrier, made from faux leather and faux suede. It is meant to be worn on a belt, that’s what the leather bit is for, with a plastic bottle inside (see below for the inside view). At some high fantasy larps it is preferred to have as little ‘now’ stuff showing as possible. But people have to drink and I decided at some point in the past that I needed a bottle cover, which I thought I wrote about, but I cannot find it anymore. However, you can admire mine below.

OLYMPUS DIGITAL CAMERA

 OLYMPUS DIGITAL CAMERA April 2014 008

The difference between these two is that mine is cross stitched and the other one is ladder stitched (?). Another difference is in the button, the present has a purple button, mine a woody coloured one. Mine has a cuff while the other folds over. This means that they’ll never be mixed up, and I even have another set of the fabrics laying in my house so I can make another one, if needed.

He seemed to like it when I gave it to him. I enjoyed making it, as it was part of my train journey one day and quite entertaining to figure out how to get it to work. So who knows, maybe another one is in the future.


‘Keep-the-hair-out-of-my-face’-device or Caul

For my larp character I wanted something easy to keep the hair out of my/her face. Since I cut my hair it’s much more difficult to braid it out of the way. While the events aren’t for a while yet, I figured it smart to start in time. Especially since I’ve been dreaming about a completely new costume. So I wandered around the internet, as you do, and found this. It seemed easy, I had a bit of fabric I didn’t mind trying a trial run in but also liked for a final product if it would work, so I got to work.

I first .. read the instructions. I know, the deal is to ‘if everything else fails, read the instructions’, however, I’ve never been that type of person. I put ikea furniture together using the actual instructions, even if there are only 2 pieces and it’s obvious how they go together. Anyways, I got out a plate and cut a circle-ish shape out. The fabric was very, very shifty so it was an approximate circle, which didn’t matter much. I did have to place it partially on two of the stripes in the fabric, but I don’t mind the effect.

Sewed it up following the tutorial until I needed to sew about 3/5 of the whipstitched edge. Then I figured I needed to go get hair clips of some kind to keep the thing on my head and deserted the total project. (I do that way to often, abandon something very close to the end.) Well yesterday I decided to pick the project up again and in the time it took to cook my meal and a little more I finished my cowl. Check that puppy out below:

OLYMPUS DIGITAL CAMERA OLYMPUS DIGITAL CAMERA

These are the front and back on my head. They are held on by clips as can be seen below:

OLYMPUS DIGITAL CAMERA OLYMPUS DIGITAL CAMERA

Also, no exposed seams within this thing, which is pretty neat if you ask me. It’s also supremely comfortable and it will keep my hair on the back of my head if I put it on correctly. This makes it much easier to run around than with hair flying everywhere. Lastly, below the stripes on the sides, these run vertical as you can also see in the right picture(s) above.

OLYMPUS DIGITAL CAMERA OLYMPUS DIGITAL CAMERA

Left is left for me and right right (I thought about that).

I seem to be in a head-cover mode lately, have a look tomorrow at the creation I finished today.

Deadline Work (6) – Backpack Finished!

Last but not least, the backpack. The backpack has been chronicled before (here, here, here, here), but I didn’t post the finished thing. I think that was because I wanted to test run it to see what improvements were needed. I only found two, the closures were not tight enough so there was some movement and the pack didn’t close easily. In the .. say 2 hours before I left for the event and on the car ride there I managed to get those issues sorted.

The solution to the first problem was to stitch the little round bits down further. Now they are attached over about a centimeter instead of the single line in the middle they were before. This worked very well when tried out in real life larp. You can just about see it in the picture below.

Updated closureThe solution to the second problem was to attach a small tie to close the front and the back. This was easily incorporated and works very well as a simple closure.

New closure

Now, as you may have gathered, I gather a lot of stuff. I like to store all that stuff somewhere and that was what the back was for originally. This is what it looks like when all the books and papers are taken out. It is almost full when all of that is also in there.

Flap Insides 3 Insides 2 Insides 1

Last but not least, the front and back. I’m very happy with those straps, they carry very nicely and were a nice copy of some straps of another backpack that I own. I’m still very surprised that that worked out as well as it did.

Back Front

And now the working to a deadline saga has finished. I’m going to see if I still have inspiration to actually make something in the coming days. As always, keep getting creative!

Deadline Work (5) – Apron

I used to wear a shirt with a lot of pockets when I went larping (here). However, I found out that this was not very practical. It made a lot of noise, I lost a lot of stuff and running was extremely difficult. That’s why I decided to make the backpack. The skirt did have some redeeming qualities, namely the two large front pockets where I could store my books. After testing out the backpack at the last event, I discovered I really wanted those pockets back. So I made an apron. With pockets.

I went through my ‘do something with this you were unsatisfied the first time around’ box, which has bits and pieces of discarded projects to find the skirt portion of this dress (here). I removed the centre back panels and zipper and created ties out of the panels. I can probably reuse the zipper in the future. I hand hemmed the sides of the apron and attached the ties. I found some brown home dec-ish stuff and made two large pockets. I embroidered a raven on one of the pockets as my character is a firm believer in the god Raven (of knowledge). It’s a very faint outline, but I know it’s there.

Raven embroidery Embroidery

I also attached some small leftover pockets to hold my pencil and other small bits that might be handy to keep close. This is the finished thing, front and back:

OLYMPUS DIGITAL CAMERA Back

And this is me in full costume. You can see the shirt, the apron, some belts and other things I wear. I’m quite packed with stuff, while some others wander around with practically nothing. To each their own, as they say.

Call 35 1

You can just see the straps of my backpack, I’ll finally post the last update on that backpack as the last entry in this series.

Deadline Work (4) – Buttoned Shirt

Gala, Queen, Wedding, and larp, the most illustrious in that particular bunch. As you may know, I tend to want to make things for larp, mostly in the week before I have to leave, which may not be the best of planning decisions. However, this time this was the case again. In my productivity I managed to make a shirt, an apron and finally finish my backpack to satisfaction. All will be revealed in the coming posts, but first, the shirt!

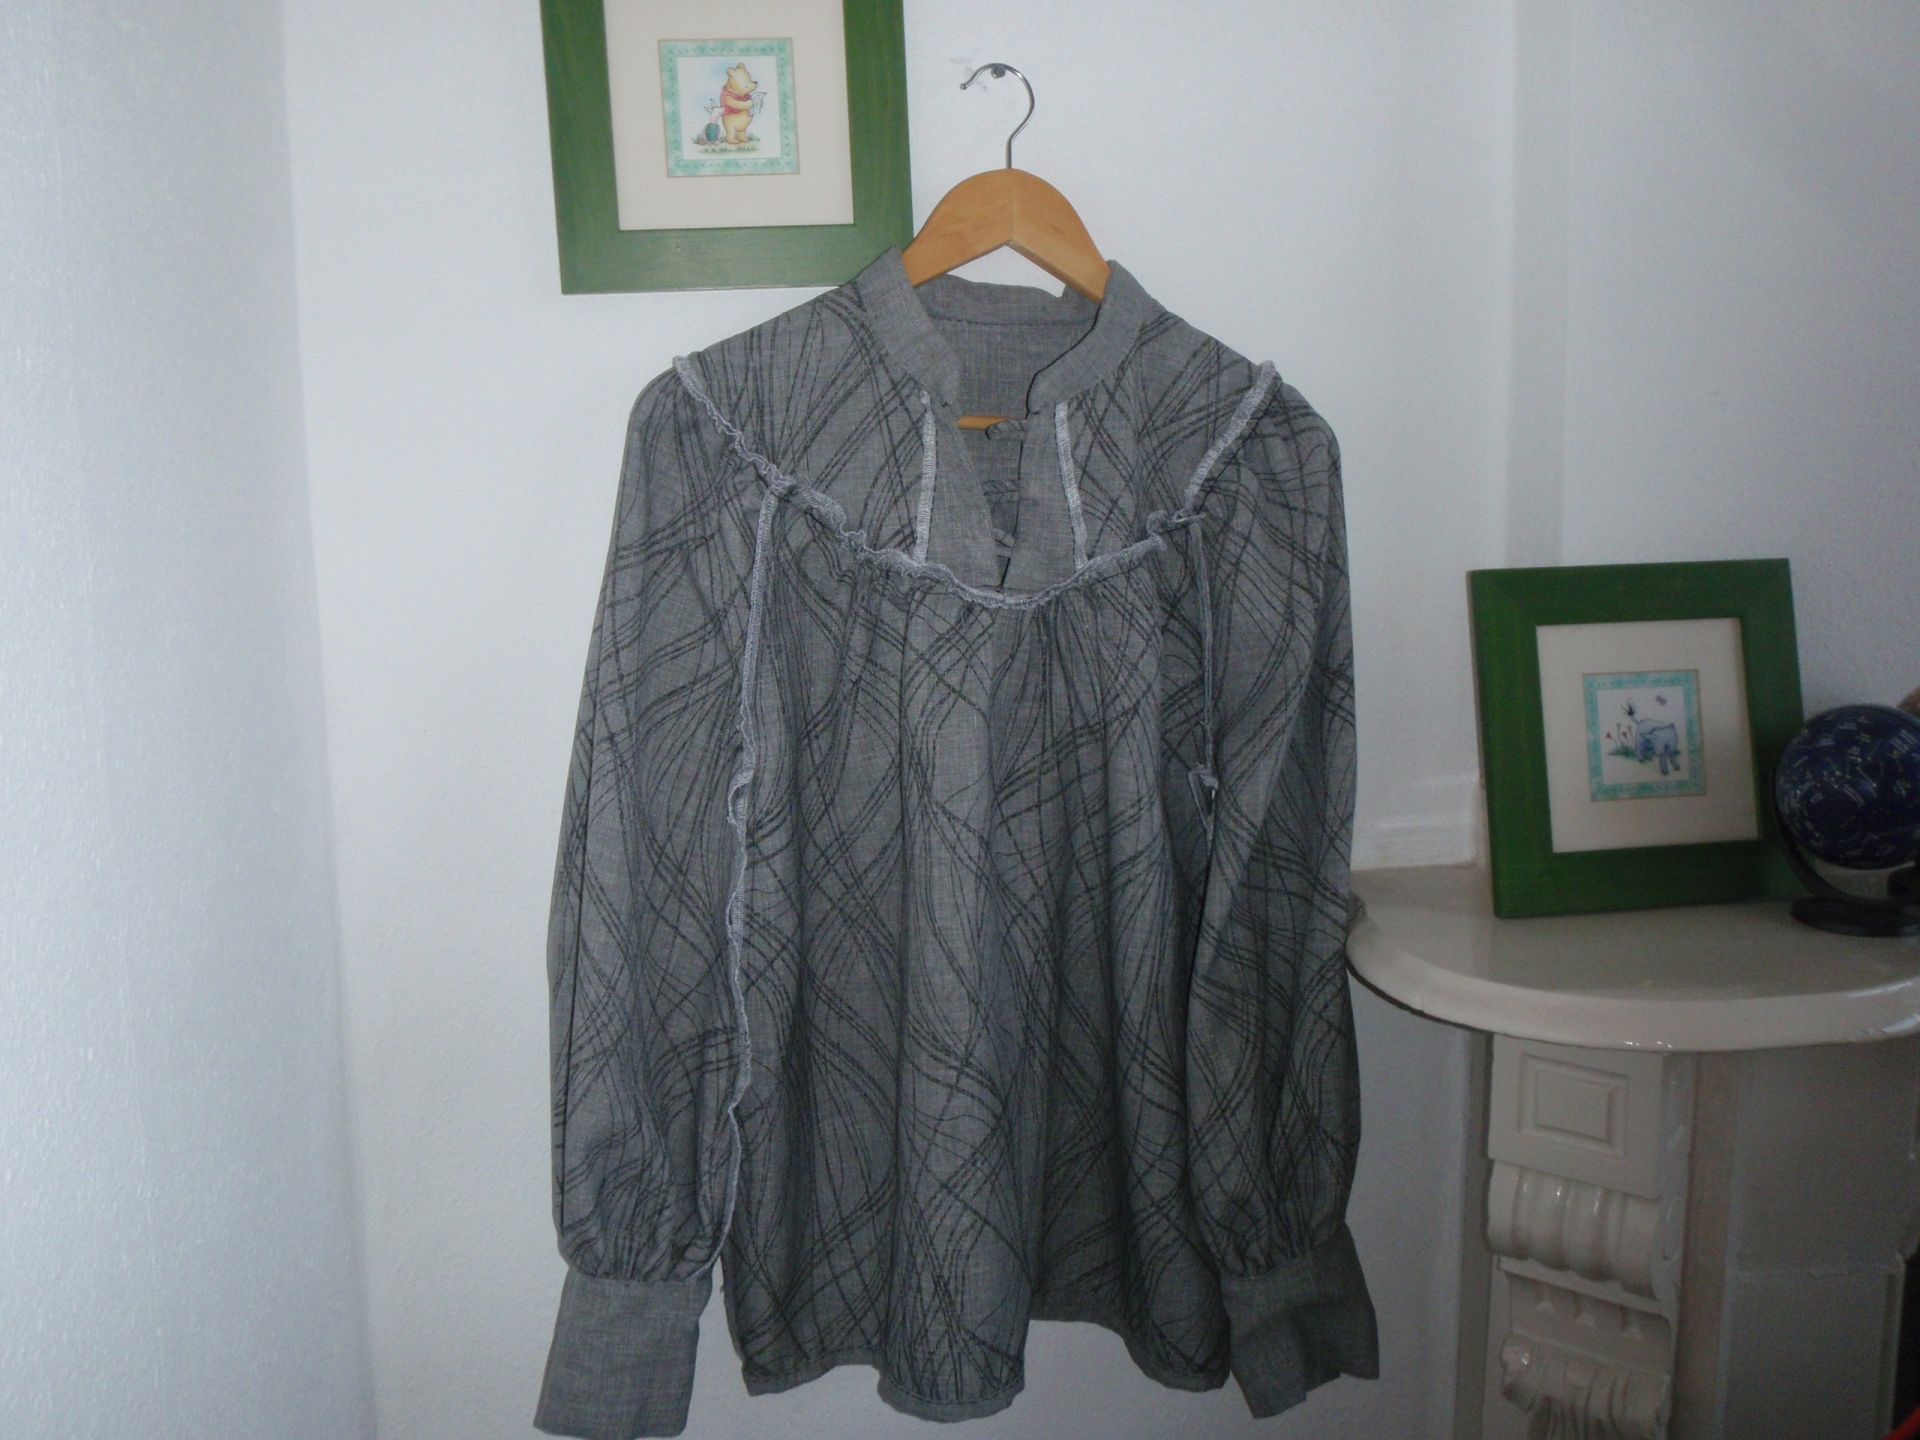
So back in winter 2013 I discovered a pattern in a Simplicity magazine that I really liked for larp. It was a kind of peasant top with gathered neckline with the possibility to attach a yoke that closed with three buttons. I only took me 10 months to trace the pattern, so that’s almost a record.. I searched my stash high and low for some appropriate fabric and eventually found some of the most fluid, ravelling, presumably fake grey linen with black lines on the outside. Those lines weren’t really appropriate but the back was plain grey, the perfect plain grey for my top.

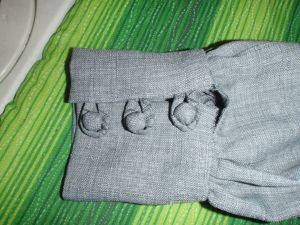
The Saturday of the cutting of this fantastic fabric was also the day I was scheduled for a very long first aid session at a film festival. I thought, correctly as it turned out, that nothing would happen at a film festival. So I had brought some of the fabric to make buttons, a tutorial of which I found here, quite a while ago. So I made myself a bunch of cute fabric buttons.

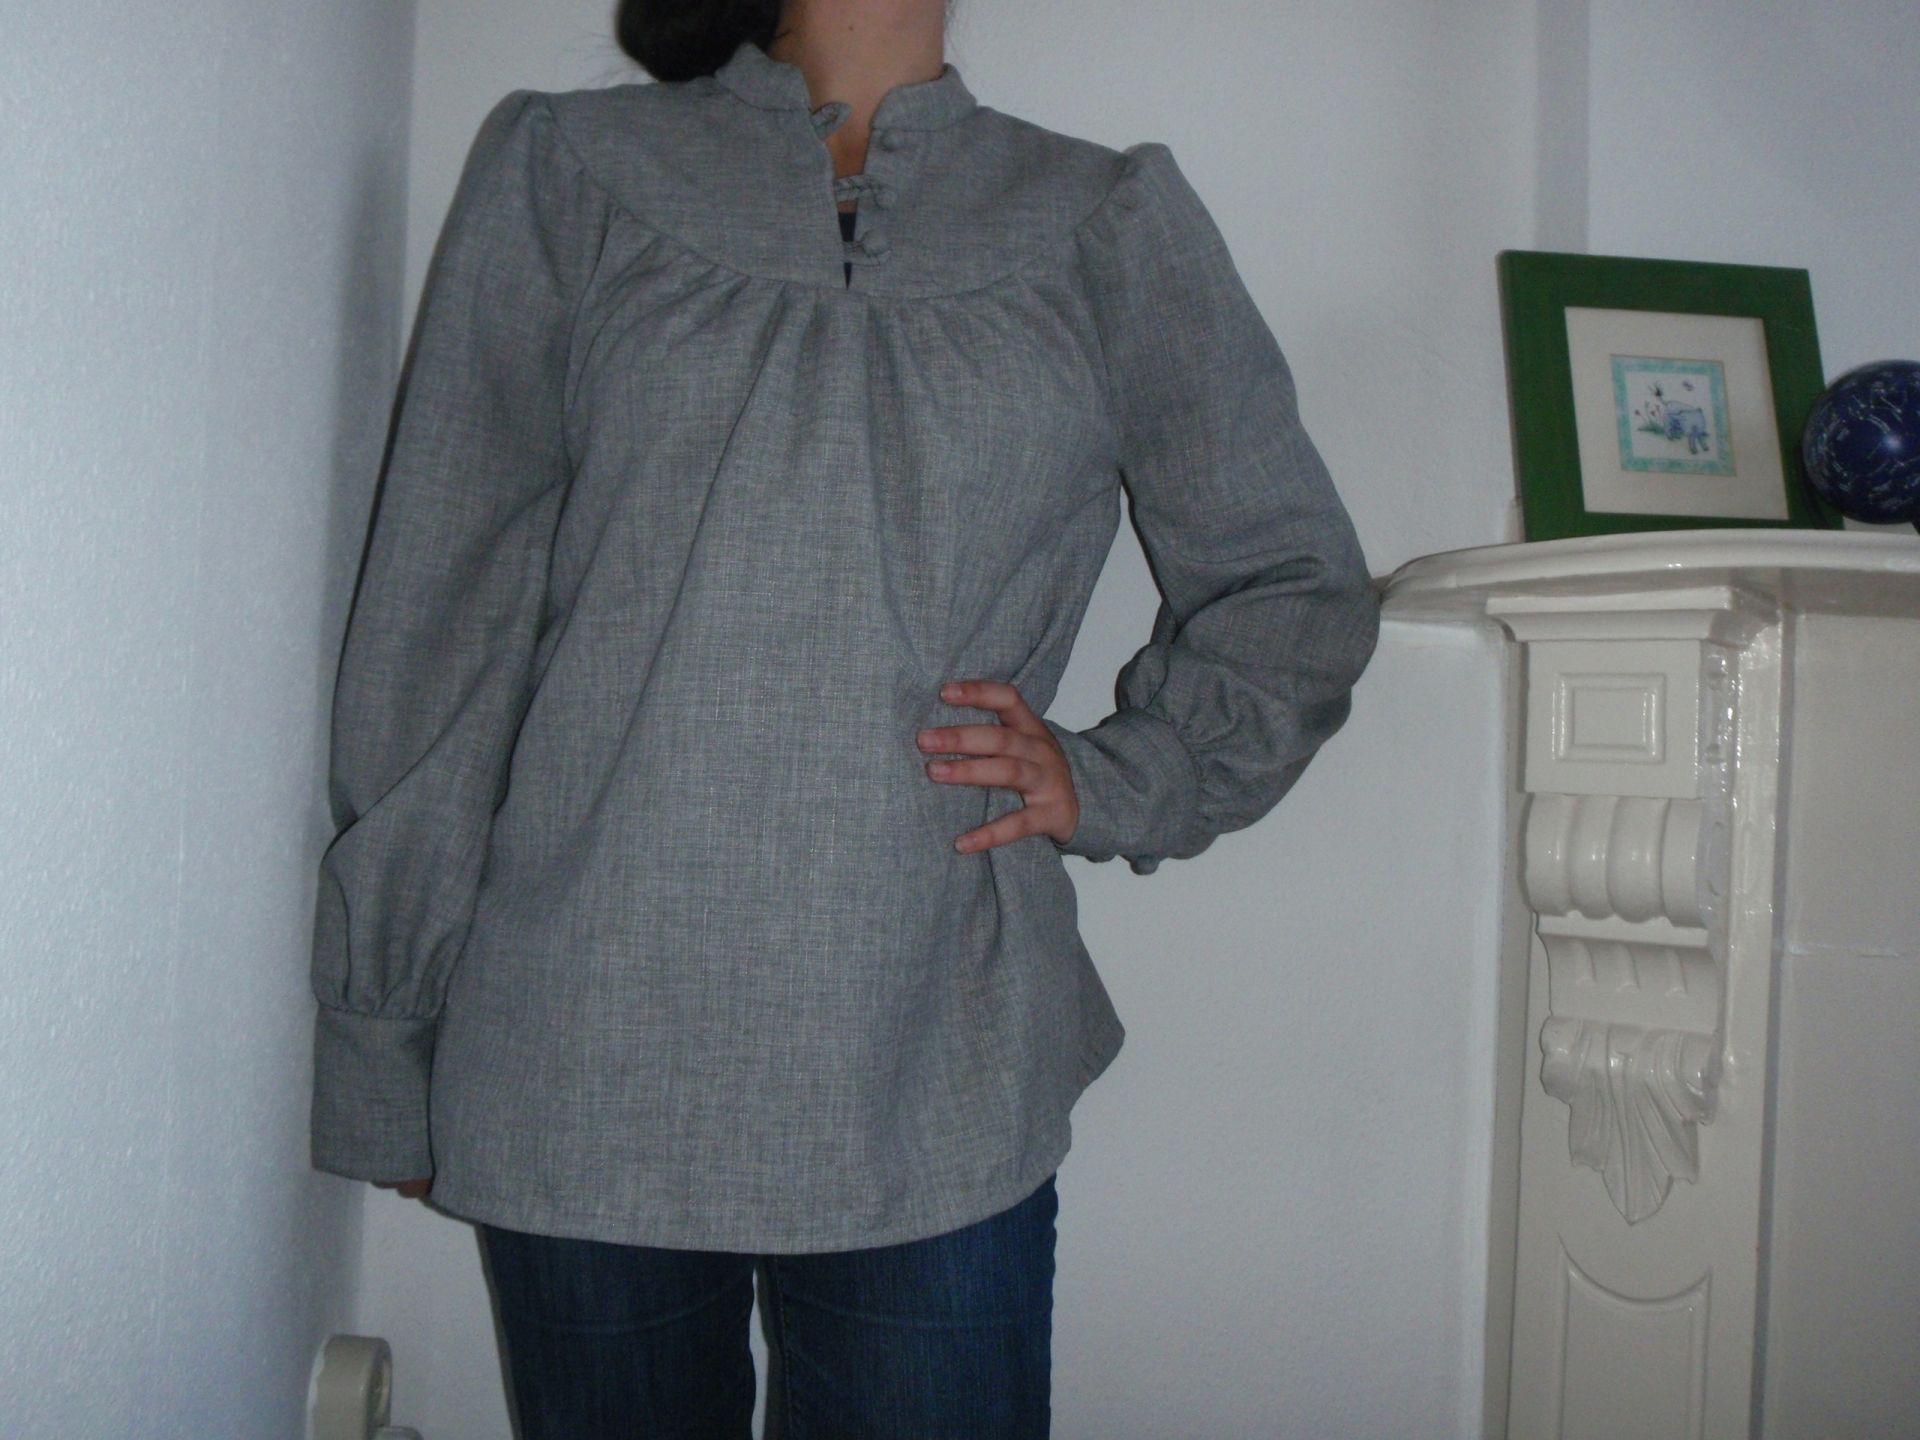
Back home, I cut the rest of the shirt, stitched it together, put it on and .. looked like a Michelin man. The arm holes almost came to my navel, but after some surgery I managed to take those in for a more comfortable fit. I finished the sleeves with cuffs that featured my buttons and the yoke too.

Sleeve cuffs Close up of yoke

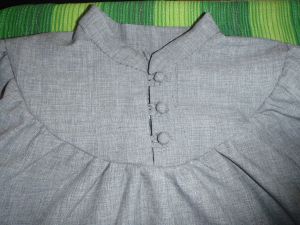
I hand sewed every stitch that would be visible on the outside, so the sleeve opening, the collarstand, the hem and the yoke facings. It was a nice detour from my usual machining.

Hand sewn hem Yoke on me

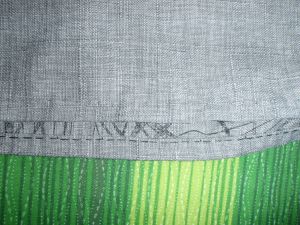
I finished all the inside seams with the serger and used the serging to create the gathering at the yoke. I was too lazy to change the serger thread so it’s white with the light blue I used for my gala dress, this did make it a lot easier to find the right thread to pull.

Inside back Inside front

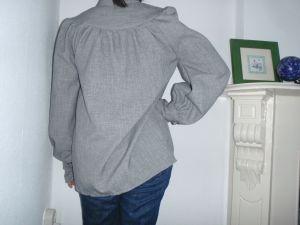
While at the larp a got quite a few compliments that I didn’t even initiate (and some I did, sorry I was proud of this make). It is nice to hear that people like what you’ve made. This is the full view on me.

Front Back

Next up: the apron.

Backpack (intermediate 3)

After almost finishing the outside of the backpack, I decided to work a little more on the inside of the backpack. I had made the lining first, but found out that it didn’t really fit that well inside so I had to redo some bits.

The lining started out like this: all pockets and a flat bit of fabric. Some markings are present from my first attempt at creating the shape. I did the exact same thing, but made it a little smaller. I forgot to take turn of the cloth into account.

Flat lining

After re-measuring and re-sewing the lining I had a square bag. I reinforced the bottom such that it would hopefully stand up straight. You can see how it looks from the inside on the right.

Lining Inside lining

While having the lining almost ready was great, I couldn’t actually put it in yet. I still needed to add the closing loop to the outside of the backpack, and maybe some more pockets. I would like to have that nicely finished and then drop the lining in, so it’s invisible from the inside. So onto the pocket making!


Backpack (intermediate 2)

I’ve been diligently working on the backpack for a while now. Before starting the embroidery (results here) I managed to close the straps, by attaching the front to the back with an overcast stitch, where I attempted to keep the stitches straight and not angled. After finishing the embroidery I overcast the flap pieces together. Before starting the embroidery I had already made a welt type hole in the front for the closure that I am going to make (I just found out I made it in the wrong direction, not very clever of me, but this way will probably work too). So now I have straps and a flap. If you look closely you can see the stitches.

Backpack back Backpack strap

The straps are connected to the bottom with ribbon. Therefore, they can be tied and retied if the backpack needs to be adjusted. I don’t know yet if this will actually work, but hopefully I’ll see during the April 11-13 road test. Below you see the backpack with the straps attached.

Backpack straps

The straps were based of a backpack that I really like the straps of. So I just copied them and cut them out in the skai leather. Then I cut them in something resembling fake suede. The fake suede was stitched (by machine) right sides together to a piece of flannel and a bit of batting was put inside such that the straps would be comfortable. It was then turned inside out and overcast to the skai bits. I think it turned out quite well.

Now on the the last couple of steps.